Pixhub https://pixhub.it/en Photo editing specialists Mon, 28 Jul 2025 08:59:58 +0000 en-US hourly 1 https://wordpress.org/?v=6.9 https://pixhub.it/wp-content/uploads/2022/02/cropped-cropped-pixhub-icona-del-sito-100x100.webp Pixhub https://pixhub.it/en 32 32 Product images that convert: how AI creates perfect settings for Amazon, Instagram, and Ads https://pixhub.it/en/immagini-di-prodotto-che-convertono-come-lai-crea-ambientazioni-perfette-per-amazon-instagram-e-adv/ https://pixhub.it/en/immagini-di-prodotto-che-convertono-come-lai-crea-ambientazioni-perfette-per-amazon-instagram-e-adv/#respond Tue, 08 Jul 2025 15:17:44 +0000 https://pixhub.it/?p=53934

In modern visual marketing, showing a product is no longer enough: it needs to be placed in a consistent, eye-catching context, tailored specifically to the channel where it will be published.

Whether it's Amazon, Instagram, Facebook Ads or a product page on an e-commerce site, today thanks to generative Artificial Intelligence it's possible to transform a simple cut-out image into a striking scene, perfect for each platform.

In this article, we show you how it works and why it's a valuable resource to sell more, spend less, and communicate better.

1. Each platform has its own visual rules

That's why you need a different image for each channel

A common mistake is using the same image everywhere. But each platform has different goals, algorithms, and audiences, and effective images must adapt to these factors.

On Amazon, you need images that:

  • Let them show the product in use
  • Communicate quality and reliability
  • Stand out among hundreds of alternatives

On Instagram, instead:

  • Visual impact is everything
  • Style, color, and feed consistency matter
  • Images must evoke an emotion in just a few seconds

In ads, finally:

  • The image must stop the scroll
  • It must immediately communicate the benefit or mood
  • It must be consistent with the textual message

👉 Ecco dove l’AI entra in gioco: ti permette di creare ambientazioni personalizzate, ottimizzate per ciascun canale, partendo da una sola foto scontornata.

2. From neutral shot to high-performance visual content

The creative process enhanced by AI

Everything starts from a well-shot photo on a white background. This is professionally cut out, then placed into realistic contexts created with AI, tailored to the visual style required by the channel.

The advantage is huge: you get more versions from a single shot, with reduced costs and fast execution.

3. Amazon: staged images that increase conversion

The importance of context in marketplaces

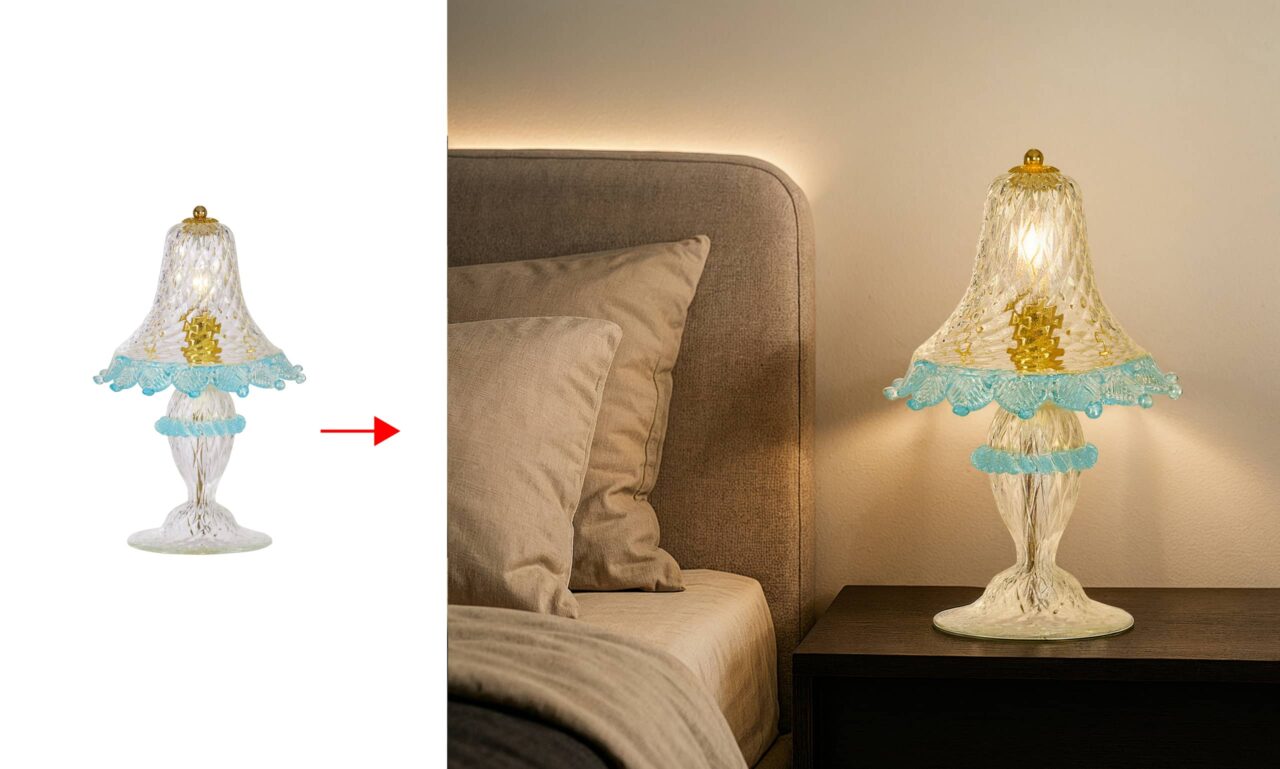
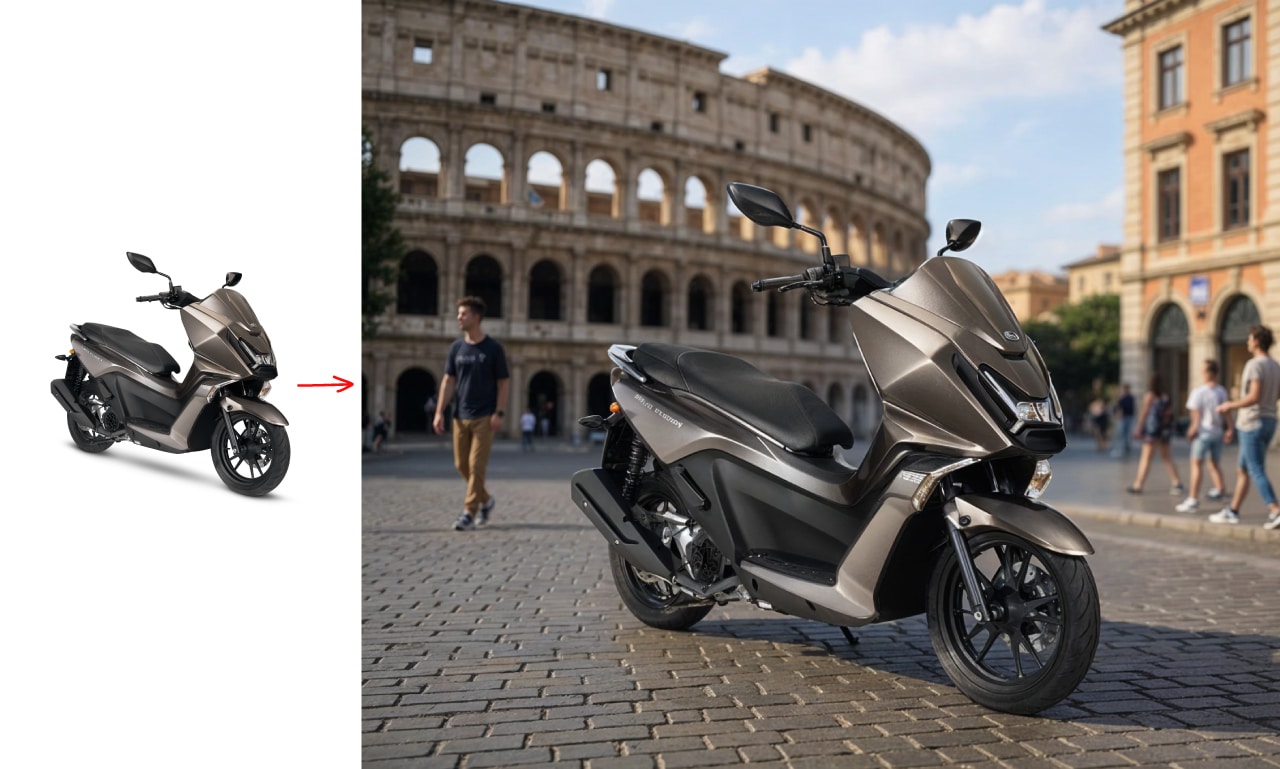
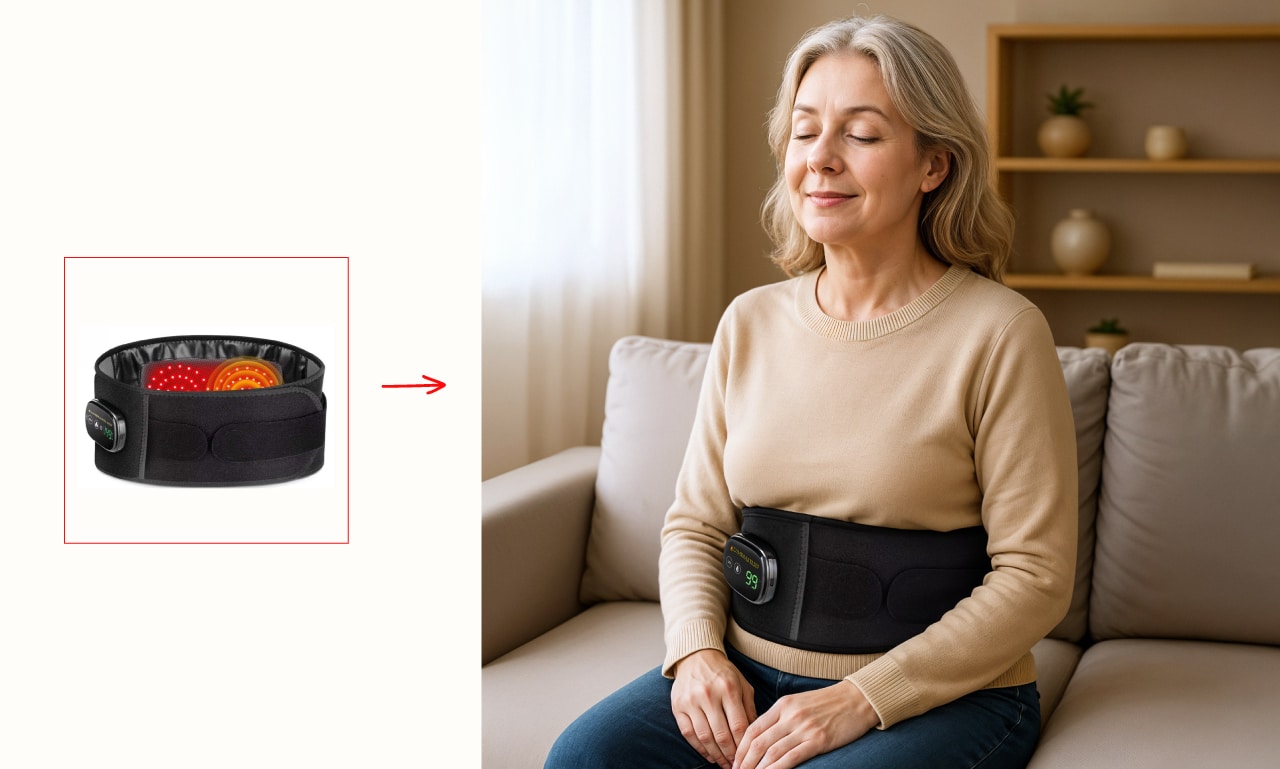
On platforms like Amazon, the image is often the only element that captures attention even before the description or reviews.
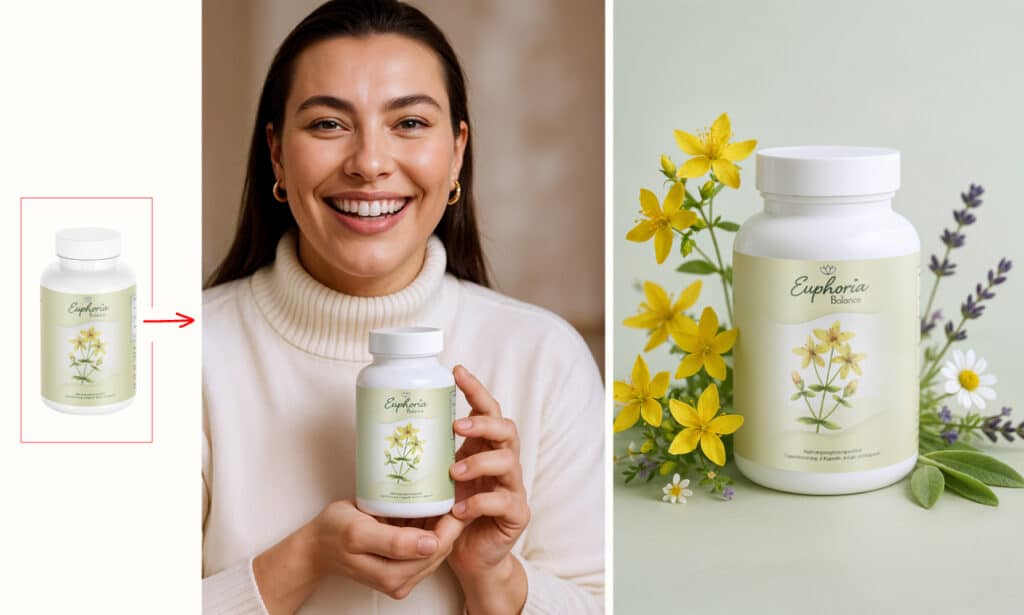
A product staged in a realistic and functional way helps the user imagine themselves already owning that item.

With AI, you can:

  • Show the product in use (e.g., a pan on a stove, a sofa in a modern living room)
  • Add coherent virtual props: accessories, hands, neutral but realistic backgrounds
  • Create visual infographics with AI and integrated text

📈 Risultato: immagini che aumentano la fiducia, riducono le incertezze e migliorano il tasso di conversione.

4. Instagram and social: emotion before function

How to create visual content that generates likes, saves, and clicks

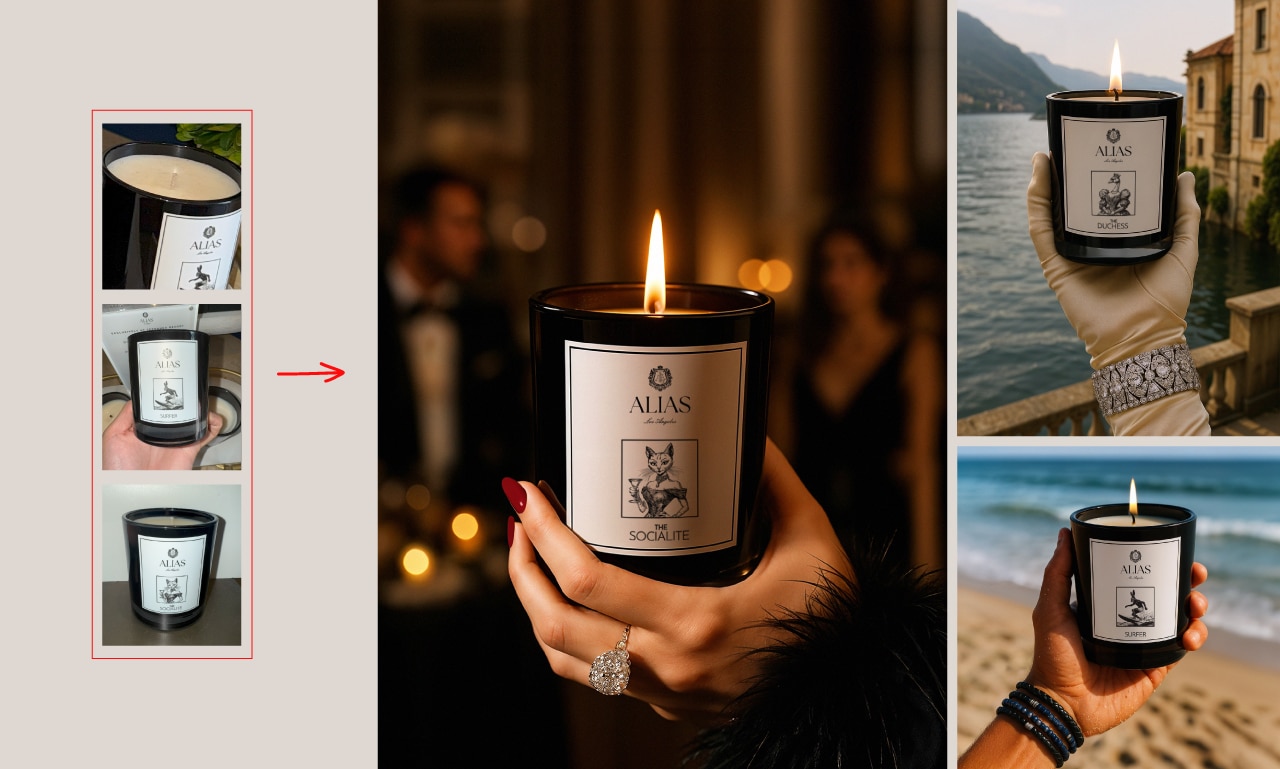
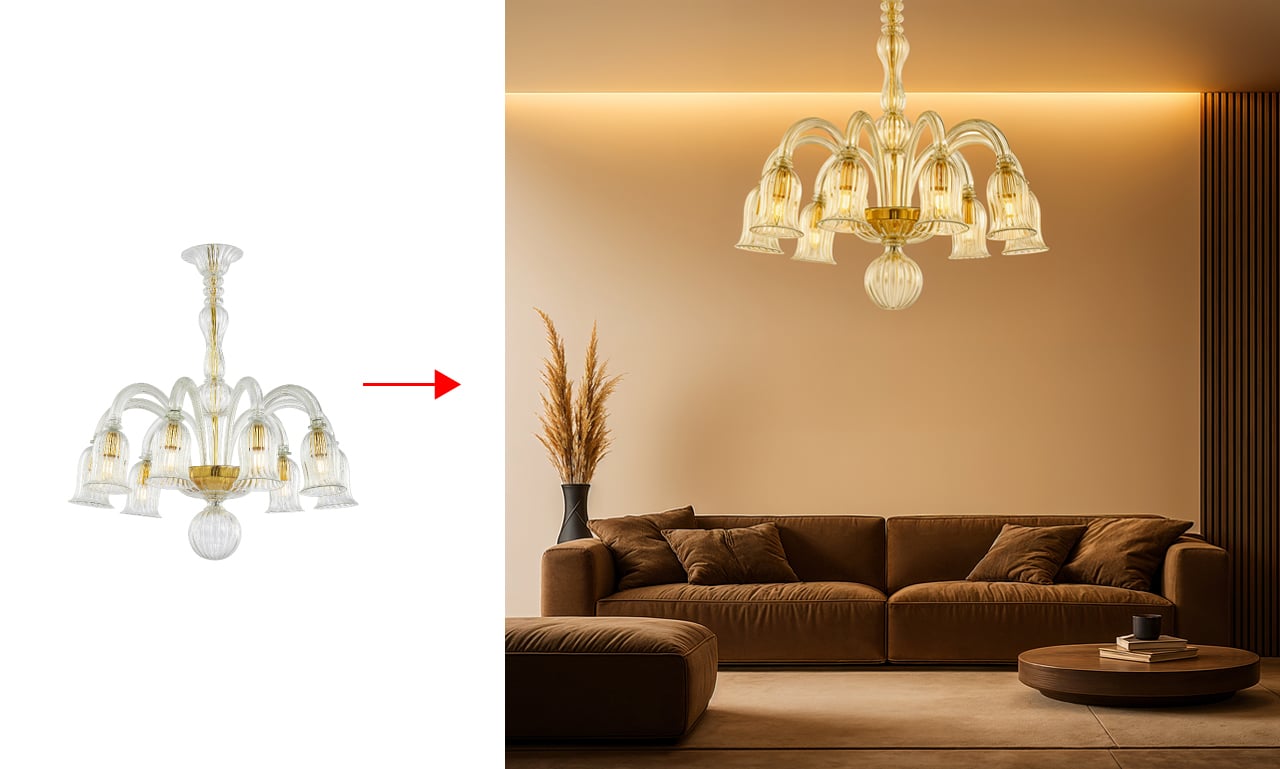
On Instagram, the photo must not only inform but also inspire.

A well-staged image with AI can:

  • Communicate a lifestyle
  • Tell a story in a single frame
  • Reinforce your brand’s visual identity

For example:

  • A pair of sunglasses resting on a towel near a pool: summer and relaxed mood
  • A face cream in a bathroom with natural light, next to a plant: self-care, sustainability, well-being
  • An office chair in a minimalist study corner: productivity, elegance, balance

🎯 L’AI ti permette di creare tutte queste ambientazioni senza set fotografici, in linea con la palette del brand e lo stile del feed.

5. Ads on Facebook and Google: stop the scroll

The importance of AI in creating tailor-made advertising images

In Facebook Ads and Google Display campaigns, the image is the first lifeline: if it doesn’t catch attention, the user scrolls away.

With AI you can:

  • A/B test different settings for the same product
  • Create seasonal, promotional, or localized versions
  • Adapt the visual to the target audience’s style (minimal, luxury, colorful, natural…)

💡 Esempio: una stessa borsa in tre contesti diversi per colpire tre target:

  • Elegant woman in an urban-chic setting
  • Student in a casual environment
  • Traveler with a lifestyle background

All this without different shootings, but with smart use of AI and a creative eye.

6. Format adaptation: one content, a thousand variants

How to optimize the image for each platform

Each platform has different sizes and proportions.

You can easily generate variants in 1:1, 4:5, 16:9, stories with AI, without starting from scratch. Additionally:

  • You can change the framing (e.g., more space for copy in sponsored posts)
  • You can insert the logo or promotional texts directly on the image
  • Within certain limits, you can reuse the same setting by modifying lights, colors, objects

👉 Il risultato? Contenuti coerenti ma dinamici, perfetti per essere usati in modo flessibile in tutti i touchpoint digitali.

7. Visual consistency and branding: AI as a creative ally

How to maintain style and identity in every image

The companies that achieve the best results are those that maintain visual consistency across all channels. With AI, you can:

  • Create a uniform visual set even without a real photoshoot
  • Replicate settings with minimal variations (same style, new colors)
  • Build a “visual world” around the brand

8. Concrete benefits: what you gain

Why using AI today is a strategic choice

✅ Risparmio sui costi: niente location, modelli, luci, styling
✅ Rapidità: ottieni decine di visual in poche ore
✅ Scalabilità: crea immagini per 10 prodotti in 10 ambienti diversi
✅ Customization: adatti ogni immagine al pubblico e al canale
✅ Controllo creativo: decidi tu il mood, l’angolazione, il messaggio

And all this, starting simply from a well-shot and cut-out photo.

Conclusion: more visibility, more conversions, less waste

The future of commercial photography is contextualized (and smart)

In a world dominated by visual content, using neutral and flat images means wasting your product’s communicative potential.
With artificial intelligence, you can instead build content designed for the right channel, with the right style, for the right audience.

📈 Vuoi aumentare le conversioni su Amazon?
🎯 Vuoi fermare lo scroll su Instagram?
🚀 Vuoi campagne più efficaci a minor costo?

AI-generated staged images are the answer. And the best time to start is now.

Would you like to discover how we transform your products into impactful staged images?

Contact us: we will transform your cut-out photos into photorealistic and emotional images, ready to captivate your customers.

]]>
https://pixhub.it/en/immagini-di-prodotto-che-convertono-come-lai-crea-ambientazioni-perfette-per-amazon-instagram-e-adv/feed/ 0
From image to context: how collaboration between photographer and AI is changing product photography https://pixhub.it/en/dallimmagine-al-contesto-come-la-collaborazione-tra-fotografo-e-ai-sta-cambiando-la-fotografia-di-prodotto/ https://pixhub.it/en/dallimmagine-al-contesto-come-la-collaborazione-tra-fotografo-e-ai-sta-cambiando-la-fotografia-di-prodotto/#respond Mon, 07 Jul 2025 08:38:25 +0000 https://pixhub.it/?p=53889

In recent years, artificial intelligence has started to play a fundamental role even in creative fields such as photo editing and visual product presentation. But the real breakthrough is not automation, but rather the collaboration between human professionals and AI tools.
In this article, we explore how a product image is created that combines real photographic quality with AI-generated settings, and why this approach is becoming increasingly central for those working in visual marketing.

1. The product image is no longer enough: a context is needed

Why staging makes the difference

A well-shot and cut-out photo is the starting point. But in a world where customers scroll through dozens of products every day, what really captures attention is the context in which that object exists.

Staging means:

  • Enhance the product by showing its use or placement
  • Convey a visual identity consistent with the brand
  • Make the image memorable and emotional

Today, all this is possible without complicated photoshoots thanks to the integration of generative artificial intelligence.

2. The perfect union: real photography + AI staging

How image and artificial intelligence work together

The winning approach is not to replace the photographer, but to amplify their potential. The workflow is divided into 3 phases:

  • Product shot on a neutral background, handled by a professional
  • Editing and cut-out, to precisely isolate the subject
  • AI-generated context: a tailor-made, photorealistic environment consistent with the brand

3. Photorealism and precision: the secrets for perfect integration

Not all AI settings are the same

One of the most common mistakes when experimenting with AI is relying on automatic tools without expert human intervention. The result? Distorted images, wrong perspectives, incorrect shadows.
To achieve a result that truly looks like a real shot, it is essential to:

  • Coordinate perspective and lighting between product and background
  • Insert shadows consistent with the lighting direction
  • Take care of context details (texture, reflections, focus)
  • Avoid “AI-recognizable” elements (strange hands, surreal geometries, impossible objects)

👉 L’abilità del professionista sta nel controllare l’output dell’AI, rifinire, scegliere e intervenire dove serve.

4. AI settings shape your brand

The impact on visual branding

Beyond economic and practical savings, AI staging opens the door to a strategic advantage: visual consistency.

You can create a series of visually coordinated images, with aligned style, color palette, and mood. This is essential for:

  • Build a recognizable identity on social media
  • Communicate values and positioning (luxury, sustainability, design, etc.)
  • Adapt images for seasons, collections, markets

5. Time and costs: why AI changes the rules

Creative efficiency without compromise

With traditional photography, every setting variation implies:

  • New set
  • New setup
  • Photographers, stylists, transportation, permits…

With AI, once you have a quality cut-out photo, you can generate:

  • 10 different environments in 1 day
  • Versions for multiple markets without duplicating shoots
  • Testable images for low-cost A/B testing

💡 Questo riduce time-to-market e aumenta la capacità di sperimentare visivamente.

6. The "wow" effect that sells

Why a well-contextualized image increases conversion

Research on visual marketing shows that contextualized images, compared to neutral ones, lead to:

  • Greater time spent on the page
  • Greater engagement on social media
  • Higher conversion rates, even up to +30%

Il motivo è semplice: il cliente immagina l’oggetto nel proprio mondo, lo visualizza, lo desidera.
👉 L’ambientazione AI ti permette di inserire il prodotto nella vita del cliente — ancora prima che lo acquisti.

7. Real-world use cases: where it works best

Where AI has a concrete impact

Some sectors are already benefiting extraordinarily from this approach:

  • Fashion and accessories: handbags, shoes, jewelry set in evocative locations
  • Furniture: chairs, tables, accessories in virtual rooms consistent with the style
  • Cosmetics: packaging placed in bathrooms, spas, natural environments
  • Technology: tech products set in modern, minimalist, or lifestyle contexts

8. The challenges to know (and overcome)

AI is powerful, but it needs to be guided

Like any creative tool, AI is not infallible. It requires:

  • A strong aesthetic vision
  • A technical knowledge of the limitations of AI output
  • A manual review process to correct small inconsistencies

For this reason, the best result is achieved when AI and human creativity collaborate, not when they replace each other.

Conclusions: the future is hybrid, and the time is now

Artificial intelligence doesn't replace photography: it expands it, enhances it, transforms it into visual storytelling. In an era where visual content is everywhere, standing out means telling a story, and telling a story means building scenarios.

With generative AI, you can:

  • Increase the effectiveness of your images
  • Reduce time and costs
  • Offer your clients a consistent and engaging visual experience

If you already have professional cutout photos, you're ready for the next leap. The future of visual marketing has already begun — and it's built one scene at a time.

Curious to see how we can enhance your products with perfect settings?

Contact us and we'll breathe new life into your cutout photos with realistic, engaging, and sale-perfect images.

]]>
https://pixhub.it/en/dallimmagine-al-contesto-come-la-collaborazione-tra-fotografo-e-ai-sta-cambiando-la-fotografia-di-prodotto/feed/ 0
When Artificial Intelligence Meets Product Photography: The Power of Virtual Staging https://pixhub.it/en/quando-lintelligenza-artificiale-incontra-la-fotografia-di-prodotto-il-potere-dellambientazione-virtuale-in-8-punti/ https://pixhub.it/en/quando-lintelligenza-artificiale-incontra-la-fotografia-di-prodotto-il-potere-dellambientazione-virtuale-in-8-punti/#respond Sun, 06 Jul 2025 13:45:41 +0000 https://pixhub.it/?p=53773

1. The New Frontier of Visual Marketing

From Cut-Out Image to the Perfect Scene (with AI)

In the world of e-commerce and visual marketing, product image is everything. But in recent years, something has changed: thanks to generative Artificial Intelligence, we can now create photorealistic settings around a product photographed on a neutral background, without the need for expensive sets, real locations, or professional models.
Imagine having a cut-out photo of a pair of shoes, a watch, a handbag, or a piece of furniture. AI can place that object in consistent, realistic, and eye-catching environments: a designer loft, a sunset beach, a boutique shelf, or a luxury restaurant table.

With AI, you cut costs

  1. No more renting locations or photo studios
  2. No more casting or hiring models
  3. No extra equipment needed for the scene (lights, props, styling)

👉 Risultato: ottieni un’immagine suggestiva e professionale a una frazione del prezzo di uno shooting tradizionale, con infinite varianti possibili (colori, mood, contesto stagionale, ecc.).

2. The Essential Features for a Realistic Result

How to Create Settings That Look Real (and Truly Sell)

To make an AI-generated scene truly effective, a generic prompt isn’t enough. Realism depends entirely on attention to detail. Here’s what must not be missing:

Consistency of Light and Shadows: the product must "sit" naturally in the environment, with coherent shadows, reflections, and compatible lighting.

Correct Perspective: the product’s angle must be aligned with that of the generated environment.

Realistic Materials and Textures: backgrounds and surfaces must be photorealistic, without plastic or painterly effects.

No Distortion or Artifacts: deformed hands, impossible perspectives, or unrealistic elements ruin the image’s credibility.

When these factors are well managed, the result is astonishing: the client can no longer tell the rendering apart from a real photograph.

3. Dynamic Staging = Visual Storytelling

Sell an Idea, Not Just a Product

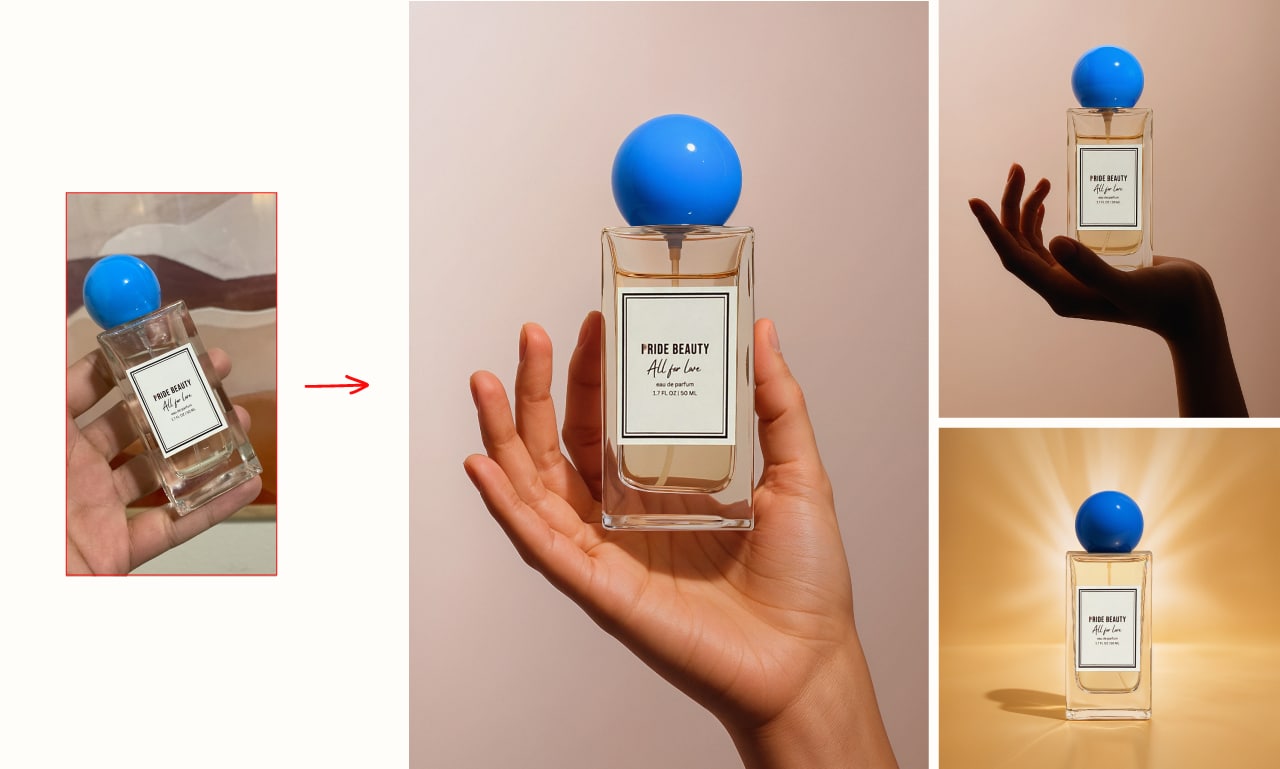
A staged image has a narrative power that goes beyond the simple technical description of the product. With AI, you can tell a visual story: you’re not just selling an armchair, but the idea of comfort in an elegant home. You’re not just showing a face cream, but a moment of relaxation in a luxurious bathroom.

Here are some examples of visual storytelling you can achieve with AI staging:

  • A perfume placed on a wooden dresser with golden light: evokes warmth, elegance, exclusivity
  • A pair of sneakers in a modern room with street art posters: conveys energy, urban style, dynamism
  • A bottle of wine on a set outdoor table: suggests conviviality, nature, special moments

👉 L’AI non crea solo sfondi: crea emozioni.

4. Tailored Customization: The Real Competitive Advantage

Every target audience has its ideal environment

One of the most powerful advantages of generative AI is the ability to create different versions of the same product to suit different audiences.

Want to appeal to a young, sporty audience? Place the backpack in a camping scene or an urban setting. Prefer an elegant image for luxury clients? Use the same photo, but stage it in a minimalist interior with natural light.

With AI, you can test multiple visuals with A/B testing, and adapt the aesthetics for different markets, seasons, or channels (website, social media, ads, catalogs).

5. When to Use AI and When Not To

Ideal Use Cases (and Limitations to Consider)

Not every image requires AI intervention, but in many cases, it’s the ideal solution:

✅ Perfect for::

  • Launching new products with still “flat” images
  • Enhancing brand perception without photoshoot costs
  • Quickly creating visuals for ads and social media
  • Visual content for trade shows, catalogs, email campaigns

⛔ Da evitare se:

  • You already have a photoshoot with models and real environments perfectly aligned with your brand
  • Your product has highly reflective surfaces that make integration complex (in this case, it’s better to use dedicated 3D renders)
  • The image requires real movement (e.g., moving liquids, genuine human interaction)

👉 In tutti gli altri casi, l’AI è un alleato strategico.

6. The Optimal Workflow: How It Works in Practice

From the product photographed on a white background to the final image

Here is an overview of the ideal process, step by step:

  1. Photo of the product on a neutral background, well-lit and high resolution
  2. Professional cut-out (precise background removal)
  3. Analysis of the ideal type of environment in base al target, canale e obiettivo
  4. AI-generated custom background, with attention to lighting, texture, and style
  5. Integration and post-production: shadows, reflections, color matching
  6. Final review and optimization for the target channel (format, compression, etc.)

This process does not replace the photographer, but supports them: it’s an additional tool to create visual value.

7. Conclusions: Why It’s Worth Integrating AI into Your Visual Strategy

Creativity + Efficiency = Success

The integration of AI into the creative process allows companies, agencies, and freelancers to:

  • Reduce production costs and times
  • Increase the visual impact of your products
  • Scale content personalization
  • Maintain full creative control over every image

AI is not a shortcut, but a powerful tool to communicate better.
The product remains at the center, but around it we build the ideal world to tell its story.

8. AI and Product Images: A Tool for Everyone

From small brands to large companies: who can truly benefit?

One of the most revolutionary advantages of generative artificial intelligence applied to visual marketing is that it’s not reserved only for large companies. Freelancers, small e-commerce, startups, and emerging brands can also access this technology to compete on equal footing with the big players in the market.

A small jewelry brand, for example, can create an elegant staged catalog without renting a studio or paying a photographer for each setting.
A handcrafted furniture maker can showcase their creations in virtual environments that convey refinement and style.
A cosmetics startup can launch a new visual campaign every month with different moods, without additional production costs.

Moreover, the speed of the process allows for great flexibility in publishing: you can react faster to market trends, create seasonal images on the fly, update last-minute campaigns, or adapt the visual tone for international markets.

👉 L’AI diventa così uno strumento democratico, che permette a chiunque di comunicare in modo professionale, coerente ed emozionale — anche con budget ridotti.

Conclusion

In an increasingly visual and competitive landscape, Artificial Intelligence applied to product photography is not a passing fad: it is a true revolution. And like all technological revolutions, it rewards those who can adopt it consciously, creatively, and strategically.

Whether you run an e-commerce, work in a creative agency, or are a professional photographer, integrating AI solutions into your workflow allows you to increase the perceived value of your products, improve the visual return on investment, and offer your clients something more: an image that tells a story, evokes emotion, and converts.

Hai già delle foto scontornate? Allora sei già a metà strada.
Ti basta un partner che sappia usare l’AI nel modo giusto. 😉

Do you want to discover how we can help you create perfect settings for your products?

Contact us and together we’ll transform your cut-out photos into exciting, photorealistic images ready to sell..

]]>
https://pixhub.it/en/quando-lintelligenza-artificiale-incontra-la-fotografia-di-prodotto-il-potere-dellambientazione-virtuale-in-8-punti/feed/ 0
Magical Editing: 10 Tips for Removing Objects from Photos (and People Too) https://pixhub.it/en/magic-editing-10-tips-for-removing-objects-from-photos-and-even-people/ https://pixhub.it/en/magic-editing-10-tips-for-removing-objects-from-photos-and-even-people/#respond Mon, 30 Sep 2024 16:15:40 +0000 https://pixhub.it/?p=39155

In the digital age, image manipulation has become an essential skill for many photography enthusiasts and designers. One of the most fascinating aspects is the ability to remove objects from photos, especially to enhance professional interior shots, corporate reportage, and product photos for online sales. On the other hand, removing people from photos is a request we receive more often from private individuals, particularly in the context of wedding photography.

With the advent of artificial intelligence, image editing tools have reached new levels of sophistication. A feature known as “Content-Aware Fill” in Photoshop has greatly simplified the removal process, but it’s important to highlight that the human touch remains essential for achieving flawless results.

remove objects from photos

Do you want to quickly remove unwanted objects from your photos? Contact us

Content-Aware Fill is an advanced Photoshop feature that uses artificial intelligence to automatically identify patterns and textures in the area surrounding the selection, allowing the unwanted object to be seamlessly covered. This revolutionary tool has significantly simplified the process of removing people and objects from photos, saving users time and effort.

However, it's crucial to emphasize that Content-Aware Fill is not a magic solution that solves all problems of removing unwanted people or objects. Although it's a powerful tool, it has its limitations. In some complex situations, such as the presence of intricate details or complex backgrounds, the result obtained from Content-Aware Fill may not be perfect.

This is why the human touch remains essential. After using Content-Aware Fill to remove the desired object, it’s important to take time to refine the image. This manual refinement process involves a range of actions—from using cloning and healing tools to adjusting fine details and shadows. For example, when removing a person from a group photo using Content-Aware Fill, imperfections or artifacts may appear around the silhouette of the removed individual. This is where human intervention becomes crucial: with careful use of correction tools, the final image can be made consistent and free from any signs of manipulation.

Moreover, the human touch is necessary to ensure that the final image maintains the desired natural and realistic look. Artificial intelligence can play a crucial role in simplifying the removal process, but it is the editor’s eye and artistic sense that determine the quality of the final result.
A skilled editor will be able to assess the image as a whole, considering proportions, lighting, and overall harmony to ensure that the edited image is consistent with the original and does not show any obvious signs of manipulation.

The removal of people and objects from a photo using artificial intelligence has made possible what once seemed like science fiction. Thanks to Content-Aware Fill, it has become easier to eliminate unwanted elements, saving time and effort. However, it's important to remember that image editing still requires the human touch to achieve flawless results.
Mentre l’intelligenza artificiale può fare molto del lavoro pesante, l’esperienza e la creatività dell’editor sono ancora indispensabili per perfezionare l’immagine, eliminare eventuali difetti e preservare l’aspetto naturale. L’editing delle immagini è un’arte che richiede pazienza, competenza e una visione artistica.

Do you want to find out how much it costs to remove objects from your photos? Click here

  1. Selezione accurata: La precisione nella selezione dell’area da rimuovere è fondamentale per ottenere un risultato ottimale. Photoshop mette a disposizione strumenti come la Bacchetta magica, il Pennello di selezione e lo Strumento di selezione rapida, che facilitano il delineare con cura l’oggetto o la persona da eliminare. Una selezione ben fatta costituisce la base per un editing di qualità.
  2. Verifica e correzione: Dopo aver applicato il Riempimento in base al contenuto, è importante esaminare con attenzione l’area modificata. Spesso possono comparire artefatti o dettagli mancanti che richiedono un intervento manuale. Strumenti come il Timbro clone o il Pennello correttore consentono di perfezionare e uniformare la zona, rendendo il risultato più naturale e armonioso.
  3. Utilizza l’opzione “Riduci rumore”: In presenza di rumore o grana nell’area rimossa, l’opzione “Riduci rumore” di Photoshop aiuta a minimizzare queste imperfezioni, rendendo l’immagine più uniforme. È però necessario usarla con moderazione, poiché un eccesso può compromettere la nitidezza complessiva dell’immagine.
  4. Ripeti e sperimenta: Quando il risultato non è soddisfacente, può essere utile ripetere l’operazione di Riempimento in base al contenuto selezionando campioni diversi dell’immagine. Inoltre, l’opzione “Scalatura” può adattare il campione alle dimensioni dell’area vuota, migliorando l’integrazione del riempimento.
  5. Considera il contesto: Il successo del riempimento dipende molto dalla coerenza con l’ambiente circostante. È fondamentale che texture, pattern e illuminazione risultino uniformi, per garantire un’immagine finale realistica e convincente.
  6. Utilizza maschere di regolazione: Le maschere di regolazione permettono di limitare l’applicazione del Riempimento in base al contenuto a specifiche zone, offrendo un controllo più dettagliato e la possibilità di intervenire solo sulle aree che necessitano di modifica.
  7. Regola l’opacità: Se l’area riempita appare troppo evidente o non si integra perfettamente con il resto dell’immagine, una riduzione dell’opacità può favorire una transizione più morbida e naturale.
  8. Sfrutta strumenti di rilevamento: Photoshop offre funzioni avanzate come la correzione della distorsione prospettica e il riempimento sensibile al contesto, utili per adattare meglio i dettagli e la prospettiva dell’area riempita, migliorandone l’integrazione nell’immagine.
  9. Prendi in considerazione la luce e l’ombra: Un aspetto spesso sottovalutato è la coerenza delle luci e delle ombre nell’area modificata. Aggiungere o modificare ombre coerenti con la scena contribuisce a rendere il risultato finale più naturale e credibile.
  10. Esamina l’immagine a diverse risoluzioni: Durante il processo di editing è consigliabile controllare il lavoro ingrandendo l’immagine per individuare eventuali imperfezioni nascoste. Questa pratica permette di correggere ogni dettaglio, garantendo un risultato finale di alta qualità.
Remove-Person-Alle-Foto

Do you want to know how much it costs to remove people from your photos? Click here

Remember that using Content-Aware Fill is an iterative process and requires practice to achieve optimal results. Experiment, refine your skills, and use the human touch to further improve the image, ensuring that it always maintains a natural and consistent look.

In many cases, when removing people or objects from a photo, a void is created in the image that requires accurately filling the empty area to achieve a natural and flawless result. After eliminating the unwanted element using Content-Aware Fill and manually refining the area, it is essential to consider the surrounding context and fill the void in a way that is consistent with the original image.

The process of filling the empty area involves using cloning tools, correcting details and shadows, and replicating the textures and patterns found in the surrounding image. This process requires meticulous attention to detail and a good understanding of the visual context to achieve a convincing result.

A crucial aspect is the ability to maintain consistency and harmony in the image while filling the empty area. If the filled area appears unnatural or shows obvious discrepancies compared to the rest of the image, the overall effect may seem fake and unconvincing.

In conclusion, the process of removing people and objects from a photo using artificial intelligence requires not only the use of the powerful Content-Aware Fill tool but also human input and expertise to manually refine the image and fill the empty area consistently. The combination of artificial intelligence and the human touch allows for extraordinary results in photo editing, opening the door to endless creative possibilities.

Send us your photos for an online quote click here

]]>
https://pixhub.it/en/magic-editing-10-tips-for-removing-objects-from-photos-and-even-people/feed/ 0
Artificial Intelligence in Photo Retouching: 5 Ways to Transform Your Photos Without Being a Professional https://pixhub.it/en/artificial-intelligence-in-photo-editing-5-ways-to-transform-your-photos-without-being-a-professional/ https://pixhub.it/en/artificial-intelligence-in-photo-editing-5-ways-to-transform-your-photos-without-being-a-professional/#respond Mon, 30 Sep 2024 14:37:14 +0000 https://pixhub.it/?p=39026

La fotografia è diventata una parte integrante della nostra vita quotidiana. Che si tratti di catturare momenti speciali, creare contenuti per i social media o semplicemente esprimere la nostra creatività, tutti noi scattiamo foto regolarmente. Tuttavia, non sempre le nostre immagini riflettono esattamente ciò che avevamo in mente al momento dello scatto. È qui che entra in gioco la modifica delle foto con l’intelligenza artificiale, un’arte che tradizionalmente richiedeva competenze tecniche avanzate e software complessi. Ma cosa succede quando l’intelligenza artificiale (IA) si unisce al fotoritocco? La risposta è una rivoluzione nel modo in cui anche i non professionisti possono migliorare le proprie foto.

In this article, we’ll explore five surprising ways AI is transforming the world of photo editing, making techniques that were once reserved for experts accessible to everyone. Whether you're a photography enthusiast just starting out or simply someone looking to give your images an extra touch, these AI-based tools will allow you to achieve professional results with ease and speed.

Photoshop AI
photoshop AI

Example of professional use of Artificial Intelligence in Image Editing

1. Miglioramento automatico

Il primo e forse più rivoluzionario modo in cui l’IA sta cambiando il fotoritocco è attraverso il miglioramento automatico della qualità dell’immagine. Grazie agli algoritmi di apprendimento automatico, i software di modifica immagini basati sull’IA possono analizzare istantaneamente una foto e applicare una serie di correzioni per ottimizzarne l’aspetto generale.

These improvements can include:

  • Automatic Exposure Adjustment
  • Color balancing
  • Sharpness enhancement
  • Digital noise reduction
  • Contrast and saturation improvement

The most surprising aspect is that all of this happens with a single click—or in some cases, even automatically when the image is uploaded. For non-professionals, this means being able to achieve professional-looking photos without needing to understand the complex technical concepts behind these adjustments.

Applications like Adobe Lightroom AI or Skylum Luminar AI use this technology to deliver stunning results in just seconds. Imagine uploading a photo taken in low-light conditions: the AI will analyze the image, balance the lighting, reduce noise, and enhance details in the shadows, transforming a potentially unusable shot into an image worth sharing or printing.

Do you want to improve your photos quickly and professionally? Contact us

2. Intelligent removal of unwanted objects

How many times have you taken what you thought was the perfect photo, only to later notice a distracting element in the background? Whether it’s a street sign, a passerby, or an out-of-place object, removing these elements used to require advanced Photoshop skills. Today, thanks to AI, this process has become incredibly simple and accessible to everyone.

AI-powered removal tools work by analyzing the area surrounding the object you want to eliminate and generating a realistic fill that blends seamlessly with the rest of the image. This process, known as “inpainting,” was once a skill reserved for the most experienced digital artists. Now, with apps like Snapseed or Photoshop’s AI-enhanced “Content-Aware Fill” feature, anyone can remove unwanted elements from their photos with surprisingly natural results.

Imagine you’ve taken a beautiful landscape photo, but there’s a trash bin in the foreground ruining the composition. With AI tools, you can simply select the bin and let the artificial intelligence remove it, filling the space with a realistic continuation of the surrounding landscape. The result? A clean, professional-looking photo that captures the beauty of the scene exactly as you envisioned it.

rimuovere-oggetti dalle foto
rimuovere oggetti dalle foto

Are you looking for a photo editing service managed by fast and precise professionals? Click here

3. Advanced retouching in portraits

Portrait retouching has always been one of the most delicate and complex aspects of photo editing. Finding the right balance between enhancing a subject's appearance and maintaining their natural look requires considerable skill and experience. AI is revolutionizing this field by offering portrait retouching tools that deliver natural and professional results, even in the hands of inexperienced users.

Here are some of the features offered by AI-powered portrait retouching tools:

  • Smoothing della pelle: riduce imperfezioni e rughe mantenendo la texture naturale della pelle.
  • Miglioramento degli occhi: aumenta la luminosità e la definizione degli occhi.
  • Modellamento del viso: permette di modificare sottilmente la forma del viso per ottenere proporzioni più gradevoli.
  • Whitening dei denti: illumina il sorriso in modo naturale.
  • Miglioramento dei capelli: aumenta la lucentezza e definisce la struttura dei capelli.

App come FaceApp o Facetune utilizzano l’IA per offrire queste funzionalità in modo intuitivo e facile da usare. La chiave del successo di questi strumenti sta nella loro capacità di applicare modifiche che sembrano naturali e non eccessive. L’IA è in grado di analizzare le caratteristiche uniche di ogni viso e applicare miglioramenti che si adattano perfettamente all’individuo, evitando il temuto effetto “plasticoso” che spesso risulta da un ritocco eccessivo o mal eseguito.

Imagine being able to enhance a selfie for your professional profile: with a few touches, you can achieve a more polished and professional look without losing your authenticity. These tools are particularly useful for those working with social media or anyone who wants to present themselves at their best online without resorting to expensive make-up and professional photography sessions.

ritocco-foto-viso
fotoritocco-del-viso

Enhance face and body in your photos now! Click here

4. Restoration of Vintage Photos

One of the most fascinating uses of AI in photo editing is its ability to breathe new life into old photographs. Colorizing black-and-white photos and restoring damaged images used to be tasks that required hours of meticulous work by specialized artists. Today, AI can perform these miracles in just a few seconds.

When it comes to colorization, advanced deep learning algorithms have been trained on millions of images to understand how different elements of a scene should appear in color. This allows AI to add realistic colors to black-and-white photos, respecting the light and shadow nuances of the original image.

Restoration, on the other hand, involves repairing scratches, tears, and other damages that photos may have suffered over the years. AI can analyze the intact parts of the image to reconstruct the damaged areas, often with surprising results

Apps like MyHeritage AI or Hotpot.ai offer these features, allowing anyone to bring their family memories back to life. Imagine being able to see a photo of your great-grandparents in color for the first time, or being able to restore a precious family photograph damaged by time. These tools not only technically improve images but also create an emotional bridge to the past, allowing us to connect with our history in ways that were previously impossible.

restoration-phototum

Want to know how much it costs to restore your old photos? Click here

5. Background Generation and Replacement

The last, but not least, way AI is revolutionizing photo editing is through intelligent background generation and replacement. This technology allows you to completely change the context of a photo or create entirely new backgrounds that seamlessly blend with the main subject.

The applications of this technology are numerous:

  • Background replacement: permette di cambiare l’ambientazione di una foto, ad esempio trasportando un ritratto scattato in ufficio su una spiaggia tropicale.
  • Creazione di sfondi virtuali: utile per videoconferenze o per creare contenuti per social media con sfondi personalizzati.
  • Miglioramento dello sfondo esistente: l’IA può aumentare la qualità e i dettagli di uno sfondo sfocato o poco interessante.
  • Background removal: isola perfettamente il soggetto principale, ideale per e-commerce o per creare immagini con sfondo trasparente.

Tools like Remove.bg o la funzione di sostituzione dello sfondo di Photoshop Elements utilizzano l’IA per rendere queste operazioni accessibili anche ai non professionisti. La precisione con cui l’IA può separare il soggetto dallo sfondo e integrarlo in un nuovo ambiente è davvero impressionante, spesso indistinguibile dal lavoro di un professionista esperto.

Imagine being able to take a selfie in your living room and transform it into a professional portrait with a studio background, or being able to change the background of your product photos to adapt them to different seasons or marketing campaigns. The creative possibilities are practically endless.

Do you want to change or remove the background of your photos? Click here

]]>
https://pixhub.it/en/artificial-intelligence-in-photo-editing-5-ways-to-transform-your-photos-without-being-a-professional/feed/ 0
The perfect integration between 3D and photographic post-production: a comprehensive vision https://pixhub.it/en/the-perfect-integration-between-3d-and-photographic-post-production-a-complete-vision/ https://pixhub.it/en/the-perfect-integration-between-3d-and-photographic-post-production-a-complete-vision/#respond Mon, 30 Sep 2024 13:30:26 +0000 https://pixhub.it/?p=38944

In recent years, the evolution of technology has led to an increasing integration between the world of 3D and that of photographic post production. This synergy has opened new creative doors, allowing digital artists to transform virtual concepts into tangible reality through a fluid and intuitive process.

In this article, we will explore the importance of this integration and analyze a concrete example through a case study involving the conversion of a logo from Illustrator format to PSD format and its insertion into images of a client's company headquarters.

3d-photo retouching
3d e fotoritocco

Example of replacing the old logo with the new one, created in Illustrator, converted to 3D, and integrated into the photo with the help of AI (client: Global Edit)

The Integration Between 3D and Photographic Post Production

The marriage between 3D and professional photo editing offers a wide range of advantages for both creative professionals and businesses. This synergy allows for the combination of digital and real elements into a single image, creating extraordinary and engaging visual compositions.

One of the main advantages of this integration is creative flexibility. Thanks to 3D, it's possible to create virtual objects with a high level of detail and realism, which can be easily manipulated and adapted to project needs. Once integrated into photographic images throughphoto editing, these elements add depth and dimension to the scene, transforming the image into something truly unique and captivating.

Furthermore, the integration between 3D and post-production allows for saving time and resources. Instead of creating physical objects for photoshoots, virtual elements can be quickly and efficiently modeled and rendered. This not only speeds up the production process but also allows for easy modifications and adjustments without the need to repeat entire photoshoots.

Case History: Conversion of a Logo from Illustrator to PSD and Integration into an Image

To fully understand the benefits of the integration between 3D and post-production, let's examine a recent case: a project carried out for one of our clients.

Let’s assume that you are a photographer (or a graphic designer, an agency... or even a business), and you’ve just taken photos of a client's headquarters. The client has changed their logo and needs to quickly replace the logo visible in the photos you took, maintaining a three-dimensional and realistic effect. Of course, each of the images you shot has a different perspective. Additionally, the company’s logo is currently only available in Adobe Illustrator (AI) vector format. 

To do this, it's necessary to convert the logo into a format compatible with photographic post-production, such as Adobe Photoshop (PSD), and then integrate it into the existing images.

The process begins with converting the logo from AI format to PSD format. Using 3D graphics software like Cinema 4D or Blender, we modeled and rendered the logo in a three-dimensional environment. This step allows us to add shadows, lights, and reflections to the logo, giving it a more realistic appearance and seamlessly integrating it with the surrounding environment.

Once the modeling and rendering are completed, the logo is exported in PSD format and imported into photo post-production software. Here, the logo can be positioned and resized to fit the images of the company’s premises. Using advanced photo editing services like layer masks and color adjustments, the logo is seamlessly integrated into the image, blending in naturally with the existing elements.

The final result is an image that seamlessly blends real and digital elements, effectively conveying the brand's message. Thanks to the integration of 3D and photo post-production, we were able to create high-quality advertising material that fully meets the client's needs.

Do you want to transform a graphic file into 3D and integrate it into a photographic image? Contact us

Conclusions

The integration of 3D and photographic post-production represents a significant step forward in the world of digital creativity. This synergy offers advantages in terms of creative flexibility, production efficiency, and visual quality, allowing digital artists to bring their visions to life in a simpler and more engaging way than ever before.
The case history analyzed demonstrates how this integration can be successfully applied in real-world contexts, producing extraordinary and satisfying results for clients. As technology advances and innovation continues in the field of digital graphics, it is likely that this synergy will become increasingly important and widespread, opening new creative possibilities for artists and businesses worldwide.
 

How Automatic Generation of 3D Environments from Real Photos Works

By using artificial intelligence algorithms to analyze existing photos, it is possible to generate 3D models of objects or environments based on those images. These models can then be integrated with photo editing to create realistic visual compositions. 
The advancement of digital technologies has enabled an interesting convergence between the 3D world and traditional photography. Thanks to artificial intelligence algorithms, it is now possible to analyze existing photos and generate 3D models of objects and environments based on those images. This innovative technology offers endless creative possibilities, allowing the integration of virtual elements with real images to create extraordinary and engaging visual compositions.

The process of automatically generating 3D environments from real photos usually follows several key steps.

Image Analysis: Existing photos are uploaded into the system and analyzed using artificial intelligence algorithms. During this phase, objects, surfaces, and environmental elements present in the images are identified and cataloged.

3D Modeling: Based on the data collected during the analysis of the images, the system automatically generates 3D models of the detected objects and environments. These models are characterized by a high level of detail and accuracy, making them suitable for integration with photo editing.

Rendering and Optimization: Once the 3D models are generated, they are rendered and optimized for use in photographic compositions. During this process, details, textures, and lights are added to ensure a realistic and convincing appearance.

Integration with Photo Editing: The generated 3D models are then integrated with the existing images through photo editing. Using specialized software, digital artists can position, resize, and modify the 3D models to fit the needs of the composition.

3D e fotoritocco

Do you need an integration between 3D and photographic image? Contact us

]]>
https://pixhub.it/en/the-perfect-integration-between-3d-and-photographic-post-production-a-complete-vision/feed/ 0
The 10 golden rules for photographing your products at their best and selling them on Amazon https://pixhub.it/en/the-10-rules-for-photographing-your-products-in-the-best-way-and-selling-them-on-amazon/ https://pixhub.it/en/the-10-rules-for-photographing-your-products-in-the-best-way-and-selling-them-on-amazon/#respond Sun, 10 Mar 2024 18:22:33 +0000 https://pixhub.it/?p=33891

Have you ever noticed how some product images on Amazon seem to shine, immediately catching your attention? They are the images that capture your curiosity and make you click to learn more.
When it comes to selling on Amazon, visual appeal is essential. Your product photos are the first impression potential customers will have of what you offer. This is exactly where image quality can make the difference between success and going unnoticed.

If you want to create successful images for your Amazon listings, you're in the right place. In this blog post, I’ll guide you through the “10 golden rules” to improve the quality of your product photos—so you can attract potential buyers, boost your sales, and stand out from the competition. Following these rules will help you present your products in the best possible way, capturing customers’ attention and offering them an engaging visual experience.

Whether you're an experienced seller or a beginner, these rules will provide you with the essential guidelines to create high-quality images that stand out in Amazon’s vast virtual marketplace. We’ll explore all the key aspects that contribute to a successful product photo, from proper lighting to the use of recommended technical specifications.

Are you ready to discover how to improve the presentation of your products and create images that grab the attention of potential buyers on Amazon? Get ready for a journey through the “10 golden rules” for successful product photos. Keep reading to learn how to stand out and make the most of your images on Amazon. Your next successful sale could be just one great photo away!

  1. Natural light: If possible, try to take photos of your items in a room well-lit by natural light. Position the product near a window or in an area where sunlight can diffuse evenly. Natural light provides accurate color rendering and uniform lighting.
  2. Artificial lighting: If natural light is insufficient or unavailable, use artificial lighting to create a uniform and well-distributed light. Avoid using a single direct light source that could create unwanted shadows. Instead, use multiple diffused light sources, such as softbox lamps or LED panels, to achieve even lighting without harsh shadows.
  3. Avoid using the flash: Avoid using the camera flash as it can create unwanted shadows and uneven lighting. The flash can also cause unwanted reflections on glossy surfaces of items. It is preferable to use continuous lighting, which allows you to better control the effect of the light on the product.
  4. Diffusers and reflectors: Use diffusers or reflector panels to modulate light and reduce excessive contrasts. A diffuser can be placed between the light source and the item to spread the light more evenly. Reflectors, on the other hand, can be used to bounce light onto the darker areas of the item, helping to reduce shadows.
  5. White balance: Make sure to set the white balance correctly on your camera or in post-production software. The correct white balance ensures that colors are rendered accurately and naturally, avoiding unwanted or unbalanced hues.
  6. Screening reflections: If the item has reflective surfaces such as glass or metal, you may need to shield surrounding objects that could cause unwanted reflections. Use screening panels or opaque fabrics to reduce reflections and achieve a clearer, distraction-free image.
  7. Try different angles and positions: Experiment with different light angles and positions of the light sources to achieve the desired effect. You can try positioning the lights from the front, the sides, or even from above to highlight the features of the item in the most optimal way.
  8. Use a tripod: Use a tripod to stabilize the camera and achieve sharp, well-defined images. This will help you avoid camera shake and ensure maximum clarity for your photos.
  9. Post-production edits: after taking the photos, you can use editing software like Adobe Photoshop or Lightroom to make minor adjustments such as brightness, contrast, and color saturation. However, make sure not to over-edit the image in order to maintain an accurate representation. Of course, your product must be displayed on a pure white background (as required by Amazon's guidelines).
  10. Consistency: make sure to maintain consistent lighting across all your product images. This helps create a uniform and professional look for your Amazon storefront.

By following these tips, you’ll be able to create bright, clear, and high-quality images for your Amazon products, attracting the attention of potential buyers and improving your chances of success in online sales.
In addition to improving the quality of your photos, it is essential to pay attention to the requirements and best practices for Amazon product images.

Do you need help improving the photos of your products? Click here

The product photographed in a context of use represents an opportunity to stand out

You may have noticed that on Amazon, publishing images of your products within a context also works very well: these are the so-called "lifestyle images".

While the product description provides detailed information, it is the product photo placed in a context that sparks the customer’s imagination. Images taken within a well-chosen context can make all the difference by showing how the product fits into the customer’s daily life.

The 5 advantages of product images placed in a realistic context:

  1. They stimulate the imagination: product images placed in realistic or creative contexts can help customers imagine what it would be like to own the product and how it could improve their lives. For example, a pair of headphones shown on a person running or listening to music can evoke a sense of empathy and provide a more realistic vision of how the product is used.
  2. They show size and proportions: having a clear understanding of the size and proportions of a product is essential for online buyers. Product images placed in an appropriate context can provide a visual reference and allow customers to better assess the actual size of the product compared to familiar objects.
  3. They create emotion: product images in emotional contexts can activate customers’ emotional connections. For example, a photo of a happy family gathered around a table full of food can evoke a sense of warmth and familiarity, increasing the likelihood that customers will identify with the product and be motivated to buy it.
  4. They show the practical use of the product.: product images in appropriate contexts can highlight their practical use and specific features. For example, an image of an appliance in a home kitchen can show how the product fits into the domestic environment and how it could simplify daily tasks.
  5. They stand out from the competition: on Amazon, similar products often compete on the same search results page. Product images in well-curated contexts can make your listing stand out from the competition, attracting attention and encouraging customers to click on your product.

Conclusions: on online selling platforms like Amazon, product images are a powerful tool to convince potential buyers. By using compelling photographic contexts, you can showcase your products and differentiate yourself from the competition. Product images within realistic or creative contexts stimulate customers’ imagination, demonstrate size and proportions, create an emotional connection, show the practical use of the product, and stand out among the multitude of online listings.

Make sure to invest time and effort into creating high-quality images that highlight your products and help customers make an informed and satisfying purchasing decision.

post-production photos for amazon
product photo editing for amazon

Do you need any advice for better photographing your products or for post-production of your photos? Contact us, we will be happy to offer you all our assistance.

]]>
https://pixhub.it/en/the-10-rules-for-photographing-your-products-in-the-best-way-and-selling-them-on-amazon/feed/ 0
Changing Colors in an Image: How to Achieve a Professional Result https://pixhub.it/en/changing-the-color-in-an-image-how-to-obtain-a-professional-result/ https://pixhub.it/en/changing-the-color-in-an-image-how-to-obtain-a-professional-result/#respond Sun, 10 Mar 2024 17:44:06 +0000 https://pixhub.it/?p=33858

In the rapidly expanding era of online commerce, product photos play a crucial role in capturing the attention of potential buyers. But what happens when you want to showcase different color variants of a product without physically producing every single option? In this article, we will explore the interesting practice of color changing in product photos, which offers e-commerce businesses the possibility to create a wide range of color variants without immediately putting each combination into production. Focusing on categories such as clothing, furniture and furnishings, lamps and chandeliers, we will discover how color changing in post-production can be a flexible and effective alternative for creating samples.

photo change photo
photo change photo

Digital Color Swatches: The Cost-Effective Solution for Every Need!

In the context of online sales, presenting different color variants of a product can be a key factor in attracting the interest of potential buyers. However, producing traditional samples for every single color combination can represent a significant logistical and economic challenge for companies. Here are some of the main challenges associated with the production of traditional samples:

Production costs and time: The physical production of samples requires considerable financial, material, and human resources. Each color variant requires purchasing materials, creating or modifying the physical product, and involving a production chain. This leads to additional costs and extended production times.

Material waste: creating physical samples involves making real products that might not be sold or used later. This can lead to significant material waste, especially if some color variants are not popular or requested by customers.

Logistical limitations: managing a wide range of color variants in a warehouse can be complex. The need to store, organize, and handle a considerable amount of physical products can become problematic, especially for companies operating with limited space.

To overcome these challenges, many companies rely on color changing in post-production. This solution offers flexibility and efficiency, allowing the creation of a wide range of color variants without the need to physically produce every single combination. With the help of photo editing tools and precise references, it is possible to obtain appealing and realistic images that represent the different color options of the product.

Do you need to create a digital sample book of your products? Contact us

photo change photo
photo change photo

Changing Colors with Photo Editing

Replacing colors in an image through photo post-production offers you a flexible and effective solution to create a wide range of color variants without physically producing every single combination. Let’s look at some key aspects of this practice.

Using Pantone References, Correct Color Files, or Physical Samples
The process of changing colors in post-production can be initiated using precise references such as Pantone color charts, which provide a standardized guide for color selection. Other options include digital files with correct colors provided by manufacturers or even physical samples of fabrics or materials. These references become the starting point for color modification in product photos for e-commerce.

Importance of Color Calibration
To achieve accurate results in color changing during post-production, it is essential to have a proper workflow and color calibration. This involves using correctly calibrated monitors and photo editing software that supports color management. Color calibration ensures that the colors displayed on the screen are true to reality and that the adjustments made have a consistent impact on the final result.

Color changing in post-production offers several advantages for companies that want to present color variants without having to physically produce each option:

  1. Time and Resource Savings in Producing Physical Samples
    With color changing in post-production, companies can save valuable time and resources by avoiding the physical production of each individual color combination. This means lower production costs and faster time-to-market for products.
  2. Greater Flexibility in Presenting New Color Variants
    With color changing in post-production, companies have the flexibility to add new color variants or modify existing combinations quickly and efficiently. This allows them to adapt to market trends or customer preferences without having to repeat the entire production process.
  3. Reduction of Material Waste
    The production of physical samples involves creating real products that may not be used or sold. This can lead to significant material waste. With color changing in post-production, companies can avoid such waste by producing only what is actually requested by customers.
  4. Flexibility in Introducing New Color Variants
    Trends and customer preferences can change quickly in the online sales sector. With color changing in post-production, companies can easily add new color variants or modify existing ones to meet market demands. This flexibility allows for rapid adaptation to customer requests and evolving trends.
  5. Easy Updates and Corrections
    If updates or corrections to the product variant colors are needed, color changing in post-production offers a quick and efficient solution. Changes can be made without having to repeat the entire physical production process, allowing products to stay up-to-date and meet customer expectations.

Overall, color changing in post-production offers a flexible, cost-effective, and sustainable option for creating color variants in product photos. It allows companies to quickly adapt to the market, reduce material waste, and customize color options to meet customer needs.

Do you need to modify the colors of the products in your photos? Contact us for a free trial

Change colors in the photos

The Color Changing Process in Post-Production

Color changing in post-production requires attention to detail and the use of appropriate tools. Here is an overview of the steps involved in the process:

Consult a Post-Production Professional or Do It Yourself?
If you lack advanced photo editing skills, it may be beneficial to collaborate with a post-production professional. These experts can make precise color adjustments to your product images, ensuring high-quality results: check out our custom photo color editing service. If you prefer to do it yourself, make sure you are familiar with key photo editing tools, such as Adobe Photoshop, to make the necessary adjustments.

Monitor Calibration: monitor calibration is essential for achieving accurate results. Make sure to calibrate your monitor using a calibration tool or by following the manufacturer’s instructions. This will ensure that the colors displayed on the screen are true to life.

Using Photo Editing Software: once you have identified the desired color reference (such as a Pantone or a file with the correct color), you can use photo editing software to make the adjustments. These tools offer advanced features to adjust hue, saturation, brightness, and other parameters that affect the image’s color. It is important to work with precision and care to achieve consistent and realistic results.

Quality control and color accuracy verification: after making color adjustments, it is crucial to conduct a quality check to ensure that the images accurately reflect the desired color variants. Make sure to compare the edited images with the original color references to ensure consistency. It is also advisable to test the images on different devices and monitors to verify that the colors are represented correctly across various platforms.

During the color changing process in post-production, it is important to maintain close communication with the production team or the supplier of the original materials. This ensures that you have access to the correct color information and references to guarantee accurate results.

Additionally, advanced techniques such as color masking can be applied to achieve selective color adjustments, allowing you to focus only on specific parts of the image, such as a product detail or an accessory.

Remember that color calibration is essential for achieving accurate and consistent results. Make sure to use calibrated monitors and follow best practices for color management in your post-production workflow.

With experience and practice, the process of color changing in post-production will become more efficient, and the results will be increasingly accurate and satisfying.

Conclusions
Color changing in product photos offers limitless opportunities for e-commerce businesses that want to showcase a wide range of color variants without physically producing every single combination. By using Pantone references, files with accurate colors, or physical samples as a starting point, it is possible to create appealing and realistic images that meet customer expectations. Investing in post-production for color changing is a smart choice.

Do you need to create color variants of your products? Try our service: Color Change of Products in Photos

]]>
https://pixhub.it/en/changing-the-color-in-an-image-how-to-obtain-a-professional-result/feed/ 0
From glassworks to e-commerce: photo editing as a tool for online sales of Murano chandeliers https://pixhub.it/en/from-glassworks-to-commerce-photographic-editing-as-a-tool-for-the-online-sale-of-murano-chandeliers/ https://pixhub.it/en/from-glassworks-to-commerce-photographic-editing-as-a-tool-for-the-online-sale-of-murano-chandeliers/#respond Sun, 10 Mar 2024 11:28:02 +0000 https://pixhub.it/?p=33791

Recently, a company together with its photographer—both regular clients of ours—faced a significant challenge. The task was to photograph a series of glass and metal ceiling lights directly at the client’s premises, despite the less-than-ideal conditions. Their main goal was to obtain images that conveyed the same beauty and brightness as the original subjects, even while working in less favorable environments.

This request involved not only correcting any visual flaws during post-production, but also the ability to capture the intrinsic magic of these objects, making them irresistible in the eyes of potential buyers. In addition, the company and the photographer had to ensure that the images faithfully reflected not only the aesthetics of the ceiling lights, but also their functionality and adaptability to different environments—thus meeting the needs of a sophisticated clientele attentive to every detail.

In particular, regarding photo editing, the client had very high expectations. They wanted the photos to be corrected and lit in such a way that the beauty and brightness of these glass masterpieces would stand out, in order to boost online sales. Considering that these objects fall into the luxury product category and have a rather high price, it was essential that the images representing them accurately conveyed their quality—especially when lit—and ideally within settings such as a home, hotel, or office.

post-produzione-fotografica

To achieve the goal, we decided to use a particular technique that consists in recreating the lighting produced by the subject in a way that is more pronounced yet still true to reality. The final result would help make the ceiling lights particularly eye-catching, without distorting their essence.

Our approach focused on creating a realistic light rendering, but more attractive and enhanced compared to the original photos, in order to make the Murano ceiling light appear even more luminous and captivating. We carefully worked on the image details to achieve a flawless clean-up of the metal parts.

Another important aspect was improving the quality of the photos using advanced photo editing techniques, enhancing sharpness, contrast, and definition.
This made it possible to showcase the Murano chandeliers in all their stunning quality and detail.

To complete the work, with Color Change of Products in Photos we created glass color variants to faithfully reproduce the entire range of available colors. This way, the client avoided having to produce all the chandeliers in all colors before making a sale.

Throughout the entire image editing process, communication with the company and the photographer was essential to ensure the success of the project.
We maintained constant dialogue, receiving timely feedback and taking their specific requests into account.
This allowed us to make the necessary adjustments and meet the client’s expectations.

post-produzione-foto

To summarize:

  1. The goal was to create bright and beautiful images to boost online sales of luxury products.
  2. A special technique was used to recreate lighting that is enhanced yet realistic.
  3. Attention to detail and photo retouching made the images clean and sharp.
  4. Color variants of the glass were created to showcase the full range available without physically producing each chandelier.
  5. Constant communication with the company and the photographer was essential to meet expectations.
  6. Professional photo retouching differentiated the final result and helped promote online sales.
  7. Attention to the client’s wishes and the photographer’s requests led to images that capture the beauty and brightness of the Murano chandeliers.
  8. The elegance and uniqueness of the chandeliers were conveyed through editing and enhancement of the photographic quality.
  9. The final result had a great visual and commercial impact for the client.
  10. Sales confirmed a decidedly upward trend.

In conclusion, our approach to professional photo retouching proved to be a differentiating factor in achieving our client’s goal. Attention to their wishes and the photographer’s requests through precise communication allowed us to create images of Murano chandeliers that capture their beauty and brightness, promoting the online sales of these exclusive handcrafted pieces. Thanks to our skills in image editing and photographic quality enhancement, we succeeded in conveying the elegance and uniqueness of these chandeliers, delivering a result with strong visual and commercial impact.

post produzione lampade

Transforming images with quality photo editing

As you can see, the millenary art of Murano chandeliers merges with the power of e-commerce in today’s digital world. While these blown glass masterpieces continue to enchant lovers of luxury craftsmanship, photo editing emerges as a fundamental tool to best showcase their beauty and appeal online. In this article, we will explore how photo editing plays a crucial role in promoting the online sale of Murano chandeliers, enabling the capture of the essence of these creations and sparking an irresistible desire in potential buyers.

1. Illuminating beauty: the key aspects of online sales are the images that showcase the products. In the case of Murano chandeliers, their unique beauty demands special attention. Photo editing allows emphasizing details, creating a realistic light rendering, and conveying the captivating brightness of the chandeliers.

2. Highlighting the craftsmanship: the artisanal details of Murano chandeliers can be difficult to capture in a photograph. Thanks to advanced photo editing, it is possible to enhance sharpness, contrast, and definition of the images, highlighting the craftsmanship behind each individual piece.

3. Accurately reproducing the variety of colors: Murano chandeliers stand out for their wide range of colors and shades. Thanks to photo editing, it is possible to create realistic color variants, offering potential buyers an accurate view of all available options. This avoids the need to physically produce every color combination, simplifying the sales process.

Enhancing the product with the setting: to help potential buyers imagine how Murano chandeliers can enrich their spaces, photo editing can be used to digitally place the chandeliers in realistic environmental contexts. This creates an emotional connection between the product and the potential customer, stimulating the desire to own an authentic Murano chandelier.

5. Effective communication with the customer: photo editing is not limited to improving the appearance of images. It is also an essential communication tool between the client and the photographer or retoucher. Through constant communication and timely feedback, it is possible to meet the client’s expectations and make the necessary adjustments to achieve the desired result.

Photo editing plays a fundamental role in promoting the online sale of Murano chandeliers, allowing to capture the beauty and uniqueness of these glass works of art. From light rendering to definition of details, through accurate color reproduction, photo editing conveys the elegance and essence of the chandeliers, arousing interest and desire in potential online buyers. Thanks to effective communication with the client and careful attention to detail, photo editing proves to be a powerful tool to promote the online sale of Murano chandeliers, bringing the millennial art of glassmaking into the contemporary digital world.

Are you looking for a highly professional service for post-production of your photos? Click here

]]>
https://pixhub.it/en/from-glassworks-to-commerce-photographic-editing-as-a-tool-for-the-online-sale-of-murano-chandeliers/feed/ 0
The 6 best photo editing apps for fixing damaged photos https://pixhub.it/en/the-6-best-applications-for-post-production-of-ruined-photos/ https://pixhub.it/en/the-6-best-applications-for-post-production-of-ruined-photos/#respond Sat, 10 Feb 2024 17:08:32 +0000 https://pixhub.it/?p=33827

Photos are an important way to preserve the memories and experiences we have lived. However, over time they can become damaged and lose quality, becoming dull and faded. Photo restoration is an effective solution to recover and improve the quality of our images.

Retouching old photos is a process that requires a lot of attention to detail and advanced technical skills. The process involves restoring, preserving, and enhancing existing photos. It can be used to recover damaged photos, correct color and exposure issues, remove scratches and dust, and more.

Digital photo restoration requires time, patience, and a good knowledge of photo editing software like Photoshop. Although it can be done on your own, if the photo is significantly damaged, it is better to turn to professionals in the field. Take a look at our Digital Photo Restoration.

restoration-phototum

If you choose to restore your photos by yourself, there are many photo editing tools available. Adobe Photoshop is one of the most widely used software. With Photoshop, you can remove scratches and dust, correct color and exposure issues, and much more. However, if you're not an expert in Photoshop, there are also other free and paid photo editing programs available that can help you restore your photos.

There are also some online services that can help you effectively restore your damaged photos. They usually have a wide range of tools and resources available to repair your photos. Additionally, it is important to choose one that has received good reviews online. 

In general, these applications offer useful tools for repairing damaged photos, but it is important to consider the specific needs of the restoration project before choosing the right app. Some applications are free, while others require a subscription or a one-time payment. Additionally, the features of each application may vary, so it is important to do some research to find the app that best suits your needs.

Here are some of the most popular applications and their main features:

  1. Pixlr: is a free photo editing application that offers a wide range of features, including spot and blemish removal, color correction, and crack repair. It is easy to use and offers preset adjustment options to simplify the photo restoration process.
  2. Adobe Photoshop Express: is a free, simplified version of the professional photo editing software Adobe Photoshop. It offers basic photo restoration features, such as color correction and spot removal, and has an intuitive interface that makes it easy to use.
  3. Fotor: this is a free online photo editing application that offers a wide range of tools for photo restoration, such as spot removal, color correction, and adding special effects. It has an easy-to-use interface and offers many preset adjustment options to simplify the restoration process.
  4. BeFunky: is a free online photo editing application that offers a wide range of tools for photo restoration, including spot removal, color correction, and adding special effects. It has an easy-to-use interface and offers many preset adjustment options to simplify the restoration process.
  5. Retouch Pilot: here is a paid online photo editing application that offers advanced features for photo restoration, such as wrinkle correction and removal of unwanted elements. It has an easy-to-use interface and offers many preset adjustment options to simplify the restoration process.
  6. Inpaint: this is a paid online photo editing application that offers advanced features for photo restoration, such as removal of unwanted objects and correction of distortions. It has an easy-to-use interface and offers many preset adjustment options to simplify the restoration process.

Another important aspect of photo restoration is the need to scan the photos. Many of our old photos are still in paper format and we do not have a digital version of them. For this reason, scanning the photos becomes a crucial part of the restoration process.

Photo scanning can be done using a home scanner or by turning to a professional scanning service. If you choose to do it at home, it is important to use a high-quality scanner and set the appropriate resolution to ensure good image quality. However, if you do not have a high-quality scanner or are unsure how to perform the scan, it is better to rely on a professional scanning service.

With our service of Digital Photo Restoration , we also offer scanning of your photographic prints, making the process simple and fast. Once your photos are scanned, our professional retouchers can begin the restoration process to ensure that your photos are restored to their best quality.

restauro foto
restauro foto

5 Valid Reasons to Entrust Your Photo Restoration to Professionals

While online photo editing applications offer a quick and convenient solution for photo restoration, there are many benefits to entrusting the restoration of your photos to professional retouchers. Here are the top 5 reasons:

  1. Professional Knowledge: Professional retouchers have a deep understanding of the photo restoration process, including the methods and tools required to properly repair damaged photos. They know how to apply color correction techniques, repair cracks, and remove spots effectively and accurately.
  2. Professional Equipment: Professional retouchers have access to high-quality equipment and photo editing software that they can use to repair damaged photos. This means your photos will be repaired using the most advanced tools and techniques available.
  3. Time Savings: Photo restoration requires time and patience to be done correctly. Entrusting the restoration of your photos to professional photo retouchers means you won’t have to spend time and effort on the restoration process and can instead focus on other activities.
  4. Customized Restoration: Professional retouchers can provide you with a customized restoration for each photo you wish to repair. This means the restoration will be tailored to the specific needs of each individual photo, ensuring optimal results.
  5. Guaranteed Quality: Professional retouchers are committed to providing the highest possible quality in the restoration process of your photos. This means that, although the cost of professional restoration may be higher than online photo editing applications, you will achieve superior quality results that will stand the test of time.

In summary, entrusting the restoration of your photos to professional retouchers can be an important investment in preserving your memories. Professional knowledge, professional equipment, time savings, customized restoration, and guaranteed quality are just some of the advantages that can be achieved by relying on photo retouching professionals.

Are you looking for a manual and highly professional photo restoration service? Click here

]]>
https://pixhub.it/en/the-6-best-applications-for-post-production-of-ruined-photos/feed/ 0